The Theolodite

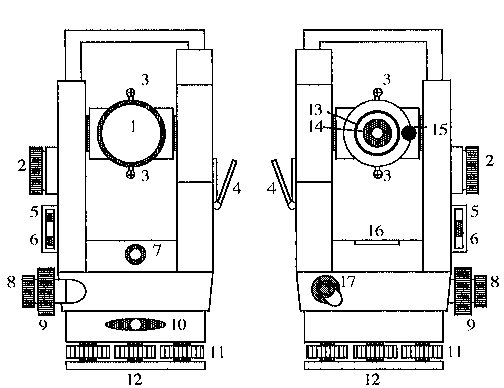
- Telescope Objective
- Micrometer Knob
- Gun sights
- Mirror for daylight illumination of readings
- Clamping lever for vertical motion
- Clamping lever for horizontal motion
- Eyepiece of optical plummet
- Horizontal fine adjustment
- Vertical fine adjustment
- Clamping screw
- Foot screw
- Baseplate
- Telescope focus
- Eyepiece withreticle focus
- Eyepiece of circle reading microscope
- Level unit with plate level and pond bubble
- Horizontal circle setting knobs, with guard.
The tripod should be set up so that its feet form a roughly
equilateral triangle with 1 metre sides. The feet should be pushed
firmly into soft ground, or wedged into irregularities (such as cracks)
on hard surfaces. The top of the tripod should be level, at about mid
chest height for the user.
- Grasp two legs and place the tripod roughly central above the
set up point, keeping the head level.
- Step back and view the tripod, shecking that it is level. If it is
not, correct it.
- Drop a small stone or coin through the tripod head as a check on
its centering.
- Place the Theodolite onto the tripod, so that by eye alone it is
level and central.
- Press the tripod feet firmly into the ground.
- Look through the optical plummet.Disregarding the need to
level the instrument, use the footscrews to bring the cente of
the plummet sight in line with the centre mark of the set up point.
- Rotate the instrument so that the plate bubble lies parallel with
one side of the triangle made by the feet of the tripod.
- By adjusting the length of one or two (not all three) of the legs,
centre the plate bubble.
- Rotate the instrument through 90'. The Plate bubble should now
point to the third leg. Adjust the length of this leg to level the
plate bubble.
- Turn back through 90', and readjust if necessary.
- use foot screws
To efficiently and accurately sight the instrument onto a point,
follow these simple steps.
- Adjust the instrument to eliminate parallax.
- With the clamps open, target the telescope onto the points using
the gun sights mounted on top of the scope.
- Close the clamps. Look through the 'scope, and using the rapid
adjustment screws, bring the target point closer to the centre of the
scope. Ensure that the instrument is focused
corectly.
- Still viewing through the scope, use the fine adjustment screws to
centre onto the target.
A theolodite is read by looking into the circle reading microscope,
in which you should see this:-
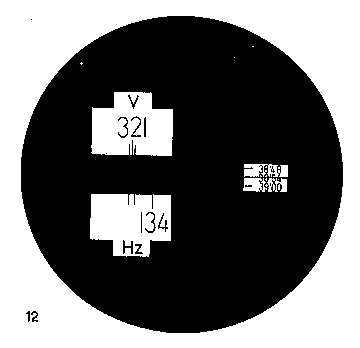
- Adjust the focus if necessary by twisting the eyepiece, and
adjust the mirror until enough light is reflected into the instrument to
allow clear reading.
- View the window marked HZ. Adjust the micrometer knob until one of
the divisions with a number below it is centered within the two small
lines. This number is the Degrees.
- Read the minutes and seconds from the middle of the small window
on the right. The diagram is a 6 second theodolite, ie it reads to the
nearest 6" .
- Sight onto the initial point of interest
- release the guard lever on the horizontal circle setting knobs.
- Depress the smallest knob, and rotate. This allows coarse
adjustment of the horizontal circle. Set to close to the required
reading.
- Apply fine adjustment to the setting by depressing and turning the
larer knob.
- Having reached the required setting, re-engage the guard lever.
Select Back to return to the Introduction screen.